Lesson 2: Ghost Follower
Intro
Hello again! In this lesson we're making our first real interactive project. The last one was an animation where the cat just did its thing on its own. This time, the user actually has control over what's happening on screen.
Here's the finished project: (insert link)
What We're Building
Simple one today:
- A ghost that follows the mouse cursor at a speed of 5 steps
That's it. No complicated logic, just one clean script.
Adding the Ghost Sprite
We won't be drawing this one ourselves. Scratch has a solid built-in library of sprites you can drop straight into your project, and we'll be using it a lot throughout these tutorials.
Head to the bottom right of the screen and click this button:
 Add new sprite
Type "ghost" into the search bar and select the first result. That's our main sprite for this lesson. Also delete the Scratch cat if you haven't already.
Setting Up the Loop
Why a Forever Loop?
In the last lesson we used a repeat loop, which runs a set number of times and then stops. Here we need something different: the ghost should keep following the mouse for as long as the project is running, not just 10 or 20 times. That's exactly what the forever loop does. It keeps repeating its contents until someone hits the stop button. In real programming languages like JavaScript or Python you'd generally want to avoid infinite loops, but in Scratch they're completely normal and pretty hard to avoid.
Basic Structure
Grab a when green flag clicked block from the Events category and drag it into the code space. Attach a forever loop to it from the Control category. Your code should look like this:
 Hat block with loop
Making the Ghost Move
Now we need the ghost to point toward the mouse and then move in that direction.
You're already familiar with point in direction from the last lesson, but that block only points a sprite in a fixed direction like up or left. Here we need it to point toward something that's constantly moving. There's a specific block for that in the Motion category: point towards (mouse pointer). This updates every frame so the ghost is always facing the cursor no matter where it goes.
After that, add a move (5) steps block. Since the ghost is already pointing at the mouse, moving forward 5 steps means moving 5 steps toward it.
The complete script looks like this:
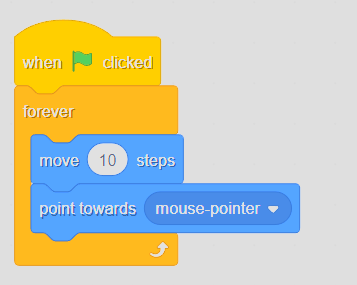 Full script
Conclusion
Four blocks and we've got a fully interactive project where the user actually influences what's on screen. Already a big step up from the last lesson. See you next time ;)