Lesson 1: Move Your Sprite
Naming Your Project
First things first, rename the project to "Cat Movement" right away. Naming is one of the most underrated parts of programming. Nobody will understand what you mean by "Untitled 1", and honestly, neither will you after a week. If you want to take a look at the result, here it is: https://scratch.mit.edu/projects/1291367656/
Making the Cat Move
First we need to make the cat move. In Scratch, movement blocks handle exactly that. Grab the move 10 steps block and drop it in the code area. To run a script in Scratch you just click it. In more complex projects that can be a bad habit, but for something this simple it's totally fine.
Click the block and you'll see the cat nudge a little to the right. What we actually want is the cat moving periodically around the screen, much more than a tiny nudge. Do we just crank up the number of steps? Well, that just teleports the cat to a completely new spot. What we want is the cat walking across the screen, turning, walking up, turning, walking left, turning, and so on.
Using a Repeat Loop
The right way to do this is with a repeat loop. It runs every block inside it a set number of times. Think of it like telling someone "do this exact thing 10 times in a row" without having to write the same instruction 10 times yourself. Head to the Control tab and grab one, then drop the move 10 steps block inside it. Click the script and watch the cat travel a fair bit to the right. To make it go even further, bump up the value, for example from repeat 10 to repeat 20. Your code should look like this:
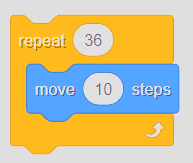 Repeat Loop
Starting the Script with the Green Flag
To make the script run when the green flag is clicked (the green flag is Scratch's start button, located above the project preview), so that anyone can watch the cat move without touching the code, grab this block:
 Green Flag
It lives in the "Events" tab and can be attached on top of any script. Attach it to our repeat loop like this:
Green Flag
It lives in the "Events" tab and can be attached on top of any script. Attach it to our repeat loop like this:
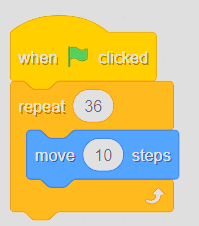 Repeat Loop and Green Flag hooked up
Now clicking the green flag should make the cat move.
Repeat Loop and Green Flag hooked up
Now clicking the green flag should make the cat move.
Setting the Starting Position
The cat might look stuck at the edge of the screen. That's because we haven't told it where to start. Every position in Scratch is described using two numbers: x (how far left or right) and y (how far up or down). The center of the screen is x: 0, y: 0. Head to the "Motion" category and grab a go to x: y: block. Set x to -180 and y to -120 so the cat starts in the bottom left corner. It should now look like this:
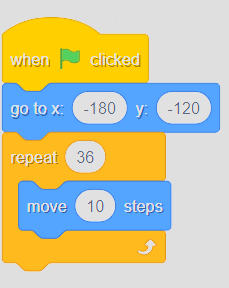 Our code
Putting it All Together
Now that we've got the foundation down, we can make the cat loop around the entire screen. Let's plan it out first:
Step 1: The cat walks to the opposite lower end of the screen and turns Step 2: The cat walks to the upper right corner and turns Step 3: The cat walks to the upper left corner and turns Step 4: The cat walks back to the bottom left corner and turns
Step 1:
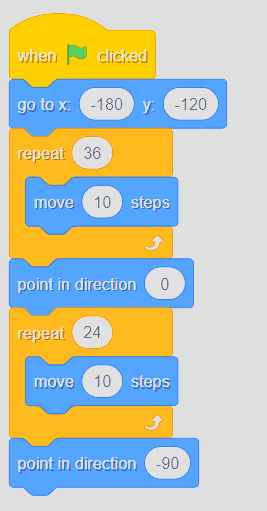
We're mostly done with this one already. Adjust the repeat loop to 36 and add a point in direction block after it so the cat turns. Set the direction to 0 since we want it pointing upward. Your code should now look like this:
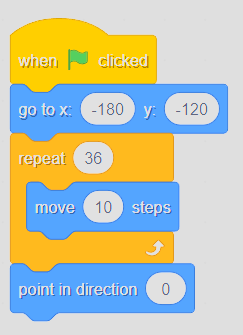 Step 1
Step 2:
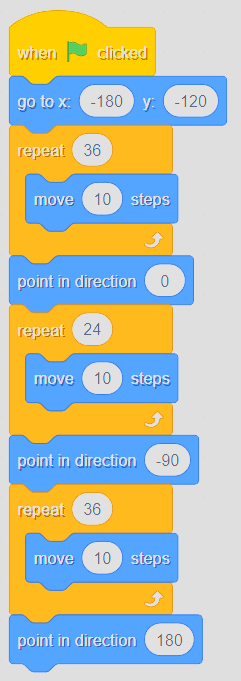
Copy the code from Step 1, adjust the values, and attach it to the existing script. Change the repeat loop to 24 and set point in direction to -90. Your code should now look like this:
 Step 2
Step 3:
Almost identical to Step 1. Change the repeat loop back to 36 and set point in direction to 180. Your code should look like this:
 Step 3
Step 4:
Nearly the same as Step 2, except set point in direction to 90 instead of -90. The final result should look like this:
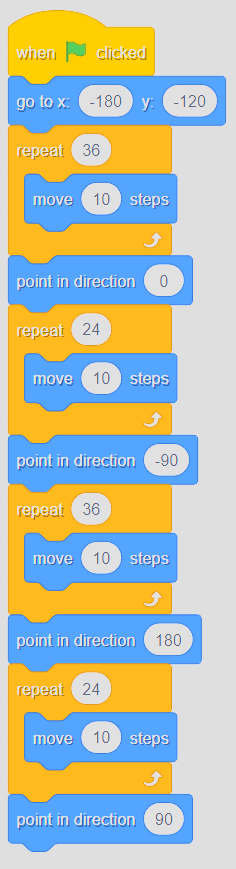 Step 4
Optional: Making the Cat Walk
Right now the cat is gliding across the screen, which looks a bit lifeless. Head to the Costumes tab. As you can see, the cat has two costumes. We can switch between them as it moves to make it look like it's actually walking.
Switch back to the Code tab and go to the "Looks" category. Find the next costume block and drop it inside each repeat loop. Run the project and the cat should be walking now.
Optional: Looping Multiple Times
If you want the cat to go around the screen more than once, just wrap another repeat loop around everything except the go to x: -180 y: -120 block.
Done!
That's it for this one. See you in the next lesson ;)