Lesson 3: Fighter Jet Side Scroller Part 2
Intro
Hello again! As you remember from the last lesson, we made a working prototype for our fighter jet game, but we still have a lot to do. Today, we’ll add several new features that will drastically improve the game.
Overview
Before diving into the code, it helps to understand what we’ll do next. Here are a few of the features we’ll add today:
- A score variable
- A timer variable
- A game-over screen
Timer variable
If you recall, we already touched on this in the 3rd tutorial. Now we need to apply that knowledge to this project. This is fairly straightforward, since our timer script works for most Scratch projects. But how do you get that script into this project? That’s a valid question.
The Backpack
Scratch has a built-in tool called “the backpack”. To use it, open your last project and drag the script to the bottom of the screen. You can store scripts, costumes, or sprites there to reuse across projects. Then go back to our current project and drag the script out of the backpack into any of the sprites.
You should now see a timer variable that starts when the game begins.
Score Variable
The game is already more fun with this small addition, but it’s still a bit boring. Let’s fix that by adding a scoring system so players don’t just survive, but also earn points.
Creating the Score Variable
First, we need a score variable. Create it in the “variables” category in the sidebar. Let’s call it “score”. Make it available for all sprites, since local variables can cause glitches.
Increasing Score after Projectile Hits Missile
I want the score to increase whenever the projectile hits the missile. To do that, add a check to the missile sprite so that when it hits the projectile, the score increases by 1. In practice, that looks like this:
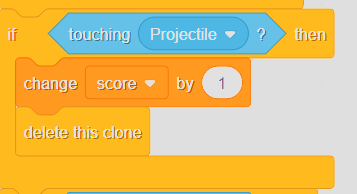 increasing the score variable
Adding delete this clone
I’m also noticing that we don’t delete the projectile after it impacts the missile and changes the score. This will undoubtedly cause problems later on (for example, the score might go through the roof), so add a delete this clone block after the change score by 1 block.
Initializing the Variable
We’re almost done creating the score system, but one crucial thing remains: resetting the variable to zero when the project starts. I can’t stress how important this is. If we forget it, the game won’t work properly, since you will automatically start with a large amount of points every time you start the project. You can add this to any script that starts with when green flag clicked.
GAME OVER Screen
Play through the game once and think about whether anything feels off. If you said “yes,” it is probably because the game simply stops when you inevitably die. There is no game over message. There is nothing, just emptiness.
New Game Over Sprite
The best way to add a game-over screen is to create a new sprite and have it appear as soon as the player dies. We will also need to change the current ending of the game. Create a new sprite and call it “Game Over”. Design a costume for it that says, in very large text, “Game Over”.
This sprite needs to show itself when the player dies, which means it should stay hidden for the rest of the game. To hide it, attach a hide block to a when green flag clicked block. But how do we know when to show it?
Events
This is where events come in. An event is broadcast across the whole project using a broadcast (message) block. You can then respond to that message using a when I receive (message) hat block. These blocks work just like when green flag clicked blocks. The difference is that they run when the message is broadcast, not when the project starts.
Creating the Message
To show our “Game Over” sprite when the game ends, we need to create a new message. To do that, click the dropdown on any broadcast block and select “create new message”. Let’s call it “Game Over” so it is clear which event triggers which action. In big projects, this can get messy.
Inside the “Missile” sprite, go to the section where we check for hitting the player. Then replace the stop (all) block with a broadcast (Game Over) block.
Now we can tell the “Game Over” sprite what to do when that event occurs. Switch to it, and grab a when I receive (Game Over) block from the “events” category. Then use a show block to make it appear. The problem is that the other sprites are still on screen and moving around. This is what it looks like:
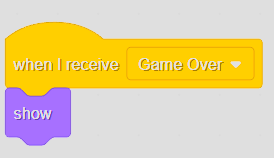 showing the game over sprite
To fix that, we should stop the scripts in the other sprites. We can do this with a stop other scripts in sprite command when each sprite receives the message. This means we should add the following script to every sprite apart from “Game Over”:
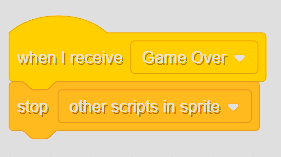 stop scripts in other sprites
Conclusion
We have just built an enormous project that covers everything from variables to events. There are still a few ways to improve it, though. For example, you could add images or draw the sprites yourself. I will not give advice on that because I am terrible at art and drawing. Feel free to experiment and add more advanced features, but for the scope of this tutorial, this is all.