Lesson 1: Singleplayer Pong
Intro
You've probably heard of Pong. It was massive in the early days of computing, well before the internet was even a thing. That's exactly what we're building today: a fully working single player Pong game. Here's the link to the finished project: https://scratch.mit.edu/projects/1291367656/
Creating the Player Paddle
First we need to create the player. In Pong, the player is just a paddle that slides along the bottom of the screen following your mouse. Go to the sprite selector and pick "Paddle". That'll be our player sprite. Let's think about what the paddle actually needs to do:
- Start at the bottom of the screen
- Follow the mouse along the x axis only, not up and down
Try to figure this out yourself before looking at my solution. Programming is about understanding what you're doing, not just copying from a tutorial blindly.
If you couldn't work it out, here's mine:
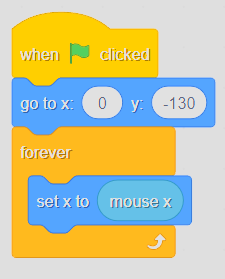
First, position the paddle at the bottom of the screen at the start of the game. Then inside a forever loop, set the paddle's x position to match the mouse's x position. NOT y, because setting y would make the paddle move up and down instead of side to side. That's the paddle done.
Setting Up the Ball
Head back to the sprite selector and search for "Ball". Add it to the project and click it to start writing the code. What does the ball need to do for the game to actually work?
- Start at
x: 0 y: 0 - Point in a random direction (anywhere from
180to-180) - Move at a constant speed (your call on how fast)
- Bounce off the edges (there's a dedicated block for this)
- Turn 180 degrees when it touches the paddle
Now turn that into working Scratch code. Seriously, don't just skip straight to copying my finished version. It doesn't help you, and it doesn't help me. Nobody wins.
Making the Player Lose
The core mechanics are in place, but right now there's no way to actually lose. The ball just flies around until you stop the project yourself.
Before we build the losing condition, let's cover two blocks you'll need here.
The first is touching (Paddle)?. This block checks whether the sprite it belongs to is currently overlapping with another sprite. If the two sprites are touching, the block returns "true". If they aren't, it returns "false". You can plug it into an if... then block so that something only happens at the exact moment two sprites make contact.
The second is pick random (1) to (10). This block picks a number somewhere between the two values you give it, completely at random. So pick random (1) to (10) could give you 1, 5, 7, or any other whole number in that range each time it runs. We'll use this to make the ball start in a random direction every round so the game doesn't feel identical each time.
With those two in mind: what should happen is that once the ball drops below a certain y value (around -140 in our game), the game ends. There's a dedicated block for this called stop all, found in the Control category. So if the ball's y position is less than -140, stop everything. In code it looks like this:
 Losing condition
Now the game ends just before the ball hits the ground.
Losing condition
Now the game ends just before the ball hits the ground.
Adding a Timer
The game works, but it feels hollow without a clear goal. A timer gives players something to compete over and brag about.
First grab a when green flag clicked block and leave it for now. We need a variable. A variable is a piece of information your project stores and can change over time. Think of it like a box with a label on it. You can put a number in the box, and then change that number whenever you need to. We want our variable to increase by one every second to act as a timer.
To create one, go to the "Variables" section and click "Make a Variable". Name it timer. Clear naming matters a lot, especially if someone else ever reads your code. Set it to 0 at the start of the game and attach it to that floating hat block.
Now make the timer count up. Add a forever loop with two blocks inside it: wait (1) seconds and change (timer) by 1. The timer script should look like this:
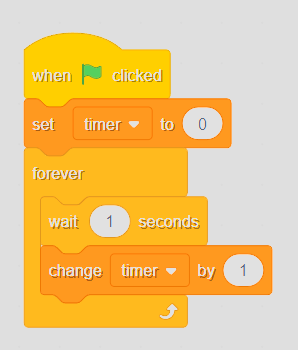 Timer code
And with that, the project is complete.
Timer code
And with that, the project is complete.
What to Try Next
There's still plenty you could add here, but what we've built is a solid foundation. Feel free to experiment with randomly occurring events, difficulty scaling, whatever sounds fun to you. That's all for today, see you in the next one ;)