Lesson 3: Singleplayer Pong
Intro
You might be familiar with the game Pong, it was very popular in the early days of computers, even before the internet. That’s exactly what we’ll be creating today, a fully functioning single player pong game. This is the the link to the finished project: https://scratch.mit.edu/projects/1291367656/
The Player
First we of course need to create the player. In Pong the player is just a slab that slides across the bottom of the screen along with your mouse (or arrow keys or WASD, but we’ll use the mouse in this tutorial). First go to sprites and pick “Paddle”. That’ll be our player sprite.
Let’s figure out exactly what we need to make this game work. We need the paddle to do these things:
- go the bottom of the screen
- Move with the mouse along the bottom of the screen (only on the x axis)
Try to think about this yourself before looking at my solution. In programming it’s really about understanding what you’re doing, not just blindly copying from some guru or website.
If you haven’t come up with a solution to this problem yourself here is mine:
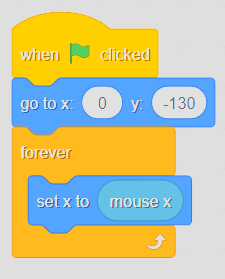 Player movement script
First we make the player go to the bottom of the screen at the beginning of the game. Then, inside a forever loop we make the paddle assume the x position of the mouse (NOT the y, because then we would be moving the paddle up and down, instead of left to right). Now we are done with the paddle. The next step is to make a ball that bounces off the walls and paddle, but if the player fails to cats it, stops the project.
The Ball
Once again go to the choose a sprite category and search for “ball”. Add it to the project and click on it to edit the code. So what do we need it to do? Well here’s the list of things the ball should do for the game to work properly:
- go to x: 0 y:0
- point in a random direction (meaning from 180 to -180)
- move with some sort of a constant speed (this is up to you)
- if it touches the paddle, turn by 180 degrees
- if it hits the edge, bounce (there is a dedicated block for that)
Now you have to make these words into working scratch code, really try not to just cheat and copy my complete version, it doesn’t help me, it doesn’t help you. Everyone loses, nobody profits.
Losing
Now that we’re done making the core game mechanics, we still need a way for the game to be well, a game. Now the ball flies around forever, unless we stop the project. What should happen though is, when the ball crosses a certain y value (in our game that would be like -140), the game should stop. For that there is also a dedicated block, called “stop all”, it can be found in the “control” category. So if the y position of the ball < -140, then it should stop the whole project. In code that looks like this:
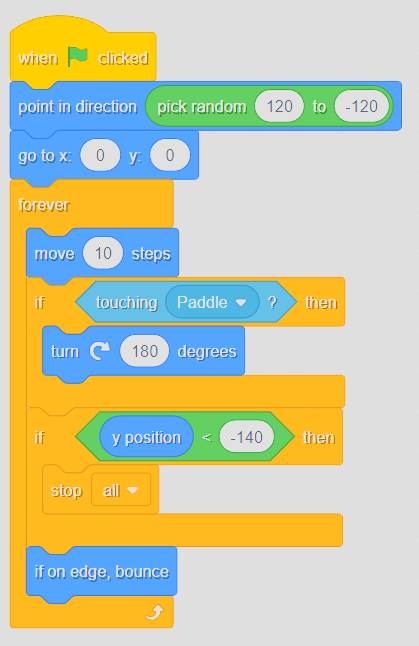 Ball movement script
As you can see, now the game stops just before the ball hits the ground.
Timer
Right now our game feels very bland and boring, that’s because the player doesn’t have a clear goal. I want to use a timer so that you can flex your results to friends and other players in general.
First we need some kind of a loop that tracks time in our game, so grab a “when green flag clicked” block and just leave it there for now. We need something called a variable. A variable is a number that doesn’t have one fixed value, rather it can be changed over the course of the game. We need our variable to increase by one every second so that it acts as a timer.
What we haven’t done yet is actually created the variable. Go to the “variables” section, and click “make a variable”. Let’s name our new variable “timer” for clarity (this is very important, especially if someone else is reading your code and trying to understand it, clear naming makes their job way easier). Set our variable to 0 at the beginning of the game, and attach it to the hat block that has been floating around there for quite some time now.
There’s just one thing left to do; Increase “timer” by 1 each second. Add a forever loop to our new script, and add the following blocks inside it: “wait (1) seconds” and “change (timer) by 1”. This is how the timer loop should look like:
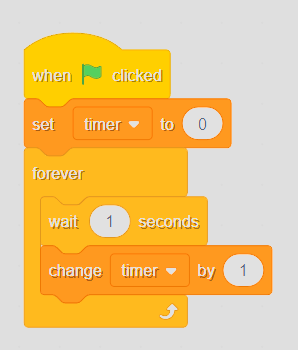 Timer script
Now we are done with the timer, with that the project is complete.
Conclusion
There are still many things that can be improved upon in this small project, but what we’ve built here is a good foundation. Feel free to add more advanced features to this, like randomly occurring events or some other fun quirks. That’s all for today, see you in the next one ;)